Create a virtual design board to help you to plan out a room, try out different decor options and see what pieces and styles go together to create a cohesive look for a room design.
After last week’s post about how to create a gallery wall, when you don’t know where to start, I had some questions about how I created the virtual design board for our gallery wall.
Guess what? It was so easy! You definitely do not need to be a professional designer to put these together (I’m not!).
I typically plan out rooms before I decorate (or redecorate) so I have some clue as what the room will look like all put together. Not to say I always stick exactly to the design plans, but it’s nice to have a general idea of what a finished room will look like before diving in.
You can see my plans for the bathroom, my parents’ bathroom, the mudroom, the home office or the living room for some ideas of room plans. I’m trying to get better about sharing them with you guys instead of just keeping them floating around in my head so you can follow along with the whole decorating process.
Virtual design boards (also called mood boards) are sooo helpful when planning a gallery wall, too. It was the perfect way for me to play around with different artwork when I was planning the gallery wall in our living room.
How to create a virtual design board:
1. Look online and save screenshots of your favorite pieces (for your own personal use only, of course).
If you’re doing a gallery wall, too, check out my tips for picking wall art or my tips for how to plan a gallery wall.
2. Create a virtual design board.
I use PicMonkey to do this (you can sign up for a free trial). You could do this in Microsoft Word, too.
I just use PicMonkey pretty much every day for photo editing so I often have it open. (There are of course plenty of other programs you could use, too, but I’m all about keeping things easy!)
If you’re using PicMonkey, keep following these steps:
3. Click “Design.”

4. You’ll see a blank white screen. On the left menu side, click the butterfly symbol.

5. You’ll see it says “Overlays” on the top. Click “Add your own,” then click ‘My computer’ from the drop down.
6. Add your screenshots from your desktop.
Then you can resize and move them around within that white design screen on PicMonkey.
This post contains affiliate links. This means if you click the link and buy something, I may receive a small percentage of sales at no extra cost to you.
I don’t worry too much about getting the size ratio of different pieces of the gallery wall right at this point. As you resize the screenshots, you’ll get a basic idea of how your finished gallery wall will look.
A virtual design board lets you easily add and take away artwork (or other decor pieces if you’re designing a whole room) so you can play around with different designs and see which layouts and pieces you like best.
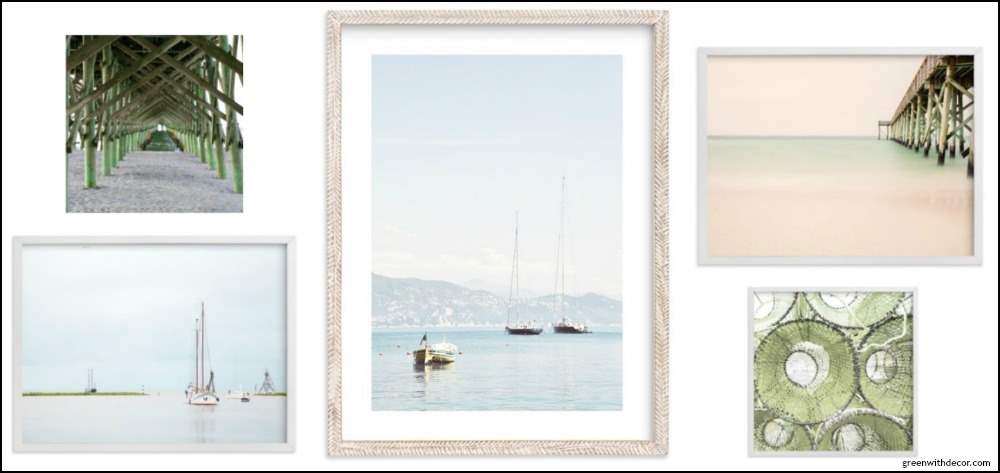
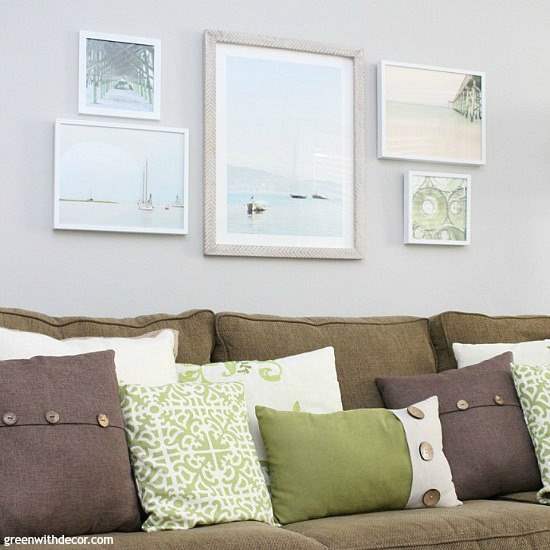
Then start decorating, and take this….
… to this!
GET THE LOOK: Boat artwork 1 | Boat artwork 2 | Pier artwork | Fishing net artwork | Couch | Cream pillows | Brown pillows | Green + white pillows | Green button pillow | Coffee table
If you want to download a high quality version of our green pier photo (upper left) from our Folly Beach vacation, just visit this blog post to grab a copy.
Isn’t that easy? Have you created any virtual design boards for rooms or gallery walls before? I love seeing designs come to life!
If you’re planning a room makeover, you might want to see these posts, too:
Remember to bookmark or pin this post if you want to save it for later!
Pin it!
Want to read more posts like this?
Follow along: Get my emails | Facebook | Pinterest | Twitter | Instagram
Jan says
What a brilliant idea that I’m going to have to try! Thanks so much for sharing this.
GreenWithDecor says
So glad it’s helpful- – happy decorating!