Disclosure: The tray in this post was provided by Walnut Hollow. All opinions, images and love of painting projects are 100% mine.
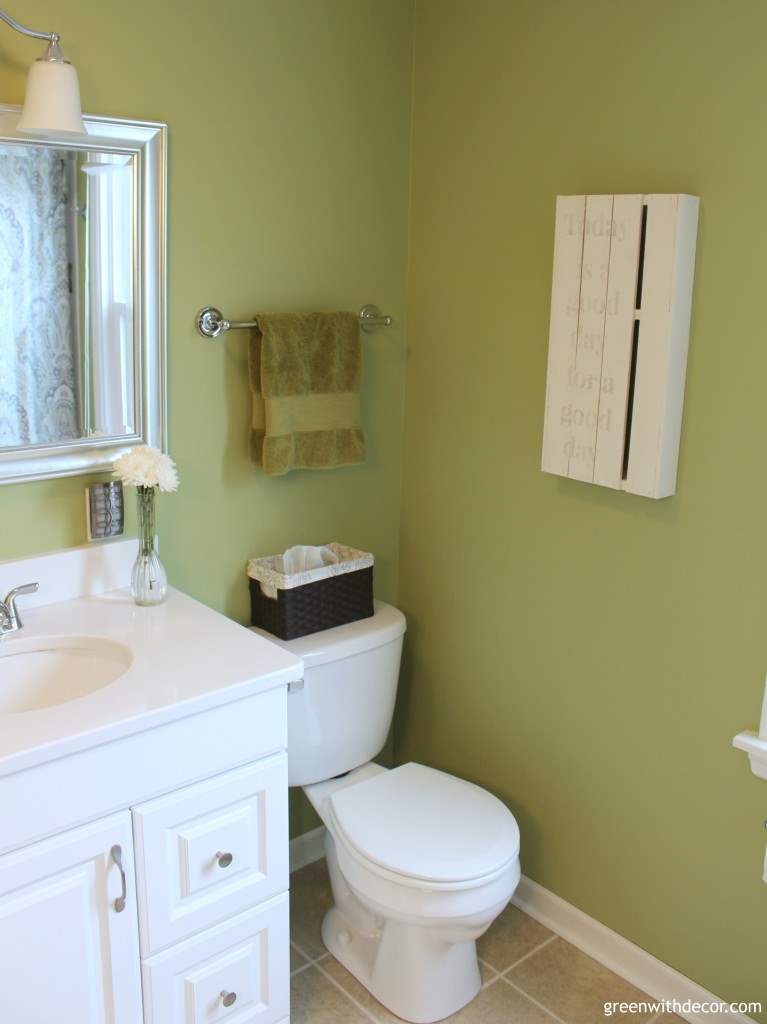
We finished our bathroom renovation a while ago, but one of the corners never seemed complete to me.
I mean the renovations were done, but the decorating wasn’t. This corner was so … plain.
Until now:
As a refresher, here’s what the corner looked like before:
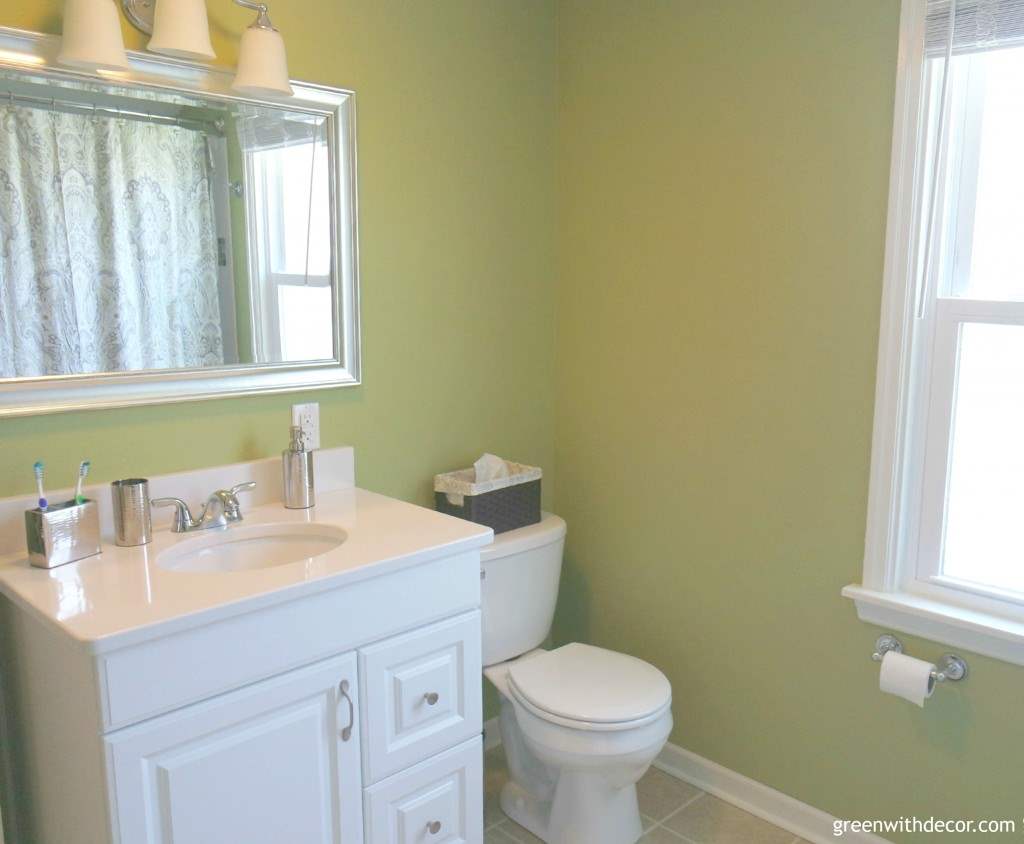
We hung the towel bar for a hand towel, because we were sick of having the towel take up counter space. I’m ALL about getting the most out of counter space in the bathroom.
I still felt like the perpendicular wall looked a bit plain and needed a decorative piece, but I hadn’t found the right one. I knew I could make one once I came up with an idea for the space.
A few months ago, the Create & Share Challenge partnered with Walnut Hollow this month. I had this pallet tray to make over. Note: Scroll down to see the other ladies’ projects. There are more trays, plus clocks and basswood rounds.
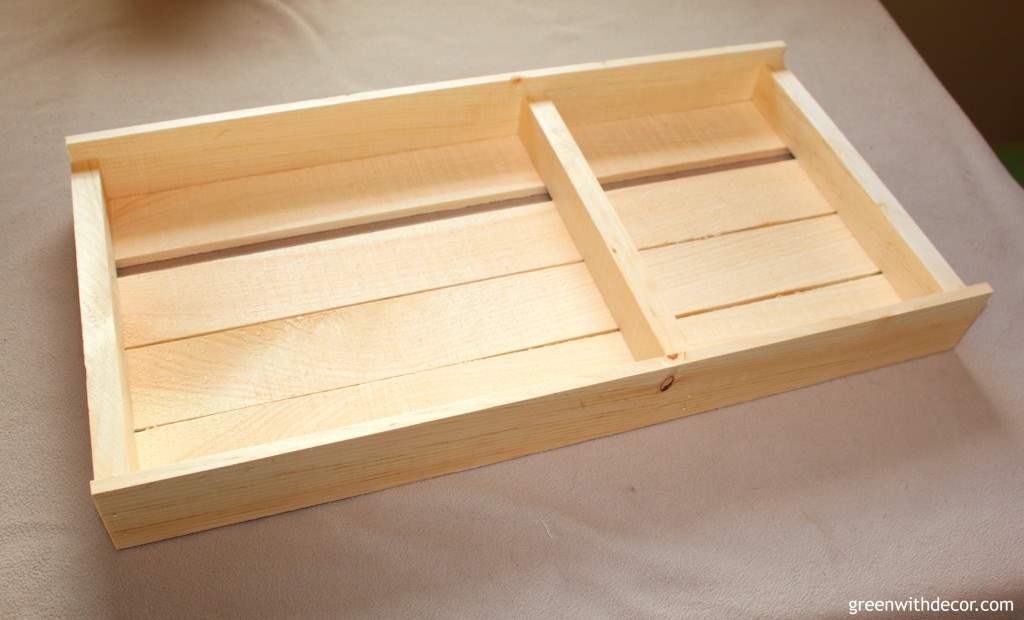
We all know I have a tray obsession, but I also liked the pallet look of the back of the tray.

Then I realized I could use the back of the tray to solve my plain bathroom wall problem.
Love when that happens!
I started thinking about what saying I could put on the tray. Anyone remember the Fixer Upper episode where Joanna puts “Today is a good day for a good day” on the living room wall? I’ve loved that quote since and have had it in the back of my mind to use for a project.
Then it hit me. The pallet plus the plain bathroom wall PLUS the quote – everything could come together for one great project!
This post contains affiliate links. This means if you click the link and buy something, I may receive a small percentage of sales at no extra cost to you.
Supplies needed to make a rustic DIY sign:
- Pallet tray
- Paint (I used Country Chic Paint’s Vanilla Frosting)
- Wax (if using chalky/clay paint – I used Wise Owl’s Driftwood wax)
- Paint brush
- Wax brush (if using chalky/clay paint)
- Printer
- Computer paper
- Painter’s tape
- Scotch tape
- Sharpie
- Drill
How to make a rustic wall sign from a wooden tray:
1. Get your paint ready.
Shake it, then stir it.
2. Paint your piece.
It’s safe to say I’ll be using this color again. I love how it’s white and bright with a rustic feel.
Give the whole piece a coat of paint, let it dry for a few hours, then gave it a second coat. Apply the paint in the same direction so the brush strokes show up in the same direction.
I always apply paint in the same direction as the wood grain, too, for a smoother look.
3. Apply wax, if using clay paint.
If you used regular paint, skip this step.
I applied clear wax, then a small amount of Driftwood gray wax. I didn’t apply too much of the gray wax, because I really like the look of the Vanilla Frosting paint I used.
If you’re not familiar with chalky/clay paint and wax, check out this blog post about a small chest of drawers I made over with chalky paint.
3. Apply your letters to your wood.
I came upon this awesome tutorial from Mountain Modern Life a while ago and always wanted to try it. (See how this project is just bringing all these random things I’ve wanted to do together? It’s working out so well!)
A few notes as I worked through the tutorial:
I used PicMonkey to write out my quote, then saved it as an image and pasted it in Microsoft Word. In Word, to flip an image so it prints backward, click Format picture > Rotate > Flip horizontal.
You could also skip the PicMonkey step and write your quote right in Microsoft Word. Write the text in a text box (rather than right in a Word document) so that you can flip the text box to print backward.
Isn’t this the coolest way ever to get a quote onto wood?! I’m definitely using this trick again.
If the letters aren’t dark enough, you can mix some water and paint and go over the letters. Ours are a little light, but I like the look of it.
I’m slowly adding a bit more rustic style to our house!
4. Hang the sign.
We used drywall screws and a drill to hang this sign up. Well, Kalen did. I told him where to hang it. 🙂
And this little corner of the bathroom finally looks complete!
It’s such a fun saying to walk into every day.
This is the view from the doorway when you walk in the bathroom:
GET THE LOOK:
Since a popular question I get is “Where’d you get that?!,” here are links to the same or similar sources:
- Wall color: Ryegrass by Sherwin Williams
- Counters: Blanco Canvas quartz
- Vanity
- Mirror
- Faucet
- Nightlight
- Basket
Have you made any fun DIY rustic signs or projects lately?
Check out the other bloggers’ projects below. I think I’m going to have to try out their wood burning kits next!
Pallet Tray projects
Casa Watkins: DIY Succulent Garden Dry Erase Board
Pocketful Of Posies: DIY Military Coin Shadow Box
Vintage Romance Style: Easy DIY Laptop Stand
Shabby Grace Blog: Herb Garden Tray
Vintage Paint and More: DIY Vintage Pallet Tray
Domicile 37: Electronics Tray
Iris Nacole: Bohemian Tray
Lovely Etc: Simple Pallet Photo Display
The Southern Couture: How To Decorate Your Home For Every Season
Green With Decor: A DIY rustic sign (you’re here!)
Monica Wants It: Gold Polka Dot Clock
The Twin Cedars: DIY Lazy Susan
Tastefully Frugal: DIY Drum Clock
Uncookie Cutter: Tabletop Clock
Refashionably Late: Stenciled Clock
My Life From Home: DIY Baseball Clock
Old House To New Home: DIY Stenciled Clock
For more DIY wall decor ideas, check out these projects
- The secret to making a DIY cork bulletin board
- A DIY towel rack from old knobs and hooks
- Repurpose old windows into picture frames
Remember to bookmark or pin this post if you want to save it for later!
Want to read more posts like this?
Follow along: Get my emails | Facebook | Pinterest | Twitter | Instagram
Cathy says
What a cute and clever idea to make it into a wall quote. Love this idea.
GreenWithDecor says
Thanks, Cathy! I just love the quote, too!
bon bon @ Farmhouse 40 says
The sign looks so great and I love the message. Great job!
GreenWithDecor says
Thanks, bonbon!
Cat @ Pocketful of Posies says
Cute idea Meg! I love that quote! Pinning!
GreenWithDecor says
Thanks, Cat!
Sara says
What a clever idea! It fits perfectly in your bathroom!!!
GreenWithDecor says
Thanks, Sara!
Iris Nacole says
How cute! Love it!
GreenWithDecor says
Thanks, Iris!
Stephanie @ One Mile Home Style says
Great idea to use the tray as wall decor! And I love that quote too!
GreenWithDecor says
Thanks, Steph!
cindy diy beautify says
Pretty neat way to use that pallet tray! Love the farmhouse look!
GreenWithDecor says
Thanks, Cindy!
Kristi @ Chatfield Court says
Love how you used the tray and that quote is awesome!
GreenWithDecor says
Thanks, Kristi!
April R - Uncookie Cutter says
Meg, this is genius! Love it and I love the quote! I love that you used the back of the tray, very unique!
GreenWithDecor says
Thanks so much, April!
Carrie says
Great idea using the back for a sign! And it works great in that corner of your bathroom!
GreenWithDecor says
Thanks, Carrie!
Sarah says
Great way to creatively use your tray, Meg! Lovely job and your bathroom looks really sweet.
GreenWithDecor says
Thanks, Sarah!
Meghan @ The Twin Cedars says
Great job Meg! This was such a fun Create & Share, so happy to hop around with you 🙂
GreenWithDecor says
Thanks, Meghan!
Tiffany says
Love this, Meg! Such a creative way to use the pallet tray. I’m definitely going to have to try that tutorial from Mountain Modern Life! Pinned and shared, friend!
GreenWithDecor says
Thanks, Tiffany! It’s a great tutorial, you’ll love it!
Katy {ashadeofteal} says
Love the quote you chose, this fits perfectly in your bathroom!
GreenWithDecor says
Thanks, Katy!