A few months ago, someone posted in one of the neighborhood Facebook buy / sell groups that they had old windows sitting out on their curb, and they were free for taking.
WHAT?! I was so excited.
I hopped in my car to pick them up. When I got there, the woman was dragging a side table out to the curb, too and said I could have it. Yes please! I knew I could paint it.
Which, brings us to today’s theme. It’s time for another The Zero Dollar DIY Challenge.
Sarah from Flourish & Knot gets a bunch of us together every other month with the goal of putting together a DIY project using only what we have at home already. (You may remember my St. Patrick’s Day wine bottles from the first post in the series.)
I think all of our husbands love this challenge more than we do, because it forces us all to do something with these random side-of-the-road finds, wine bottles, extra paint, all that other ‘stuff’ we all hoard in the name of future projects!
Well here’s the beautiful side-of-the-road table now. You’d never know it was old and beat-up, would you!?
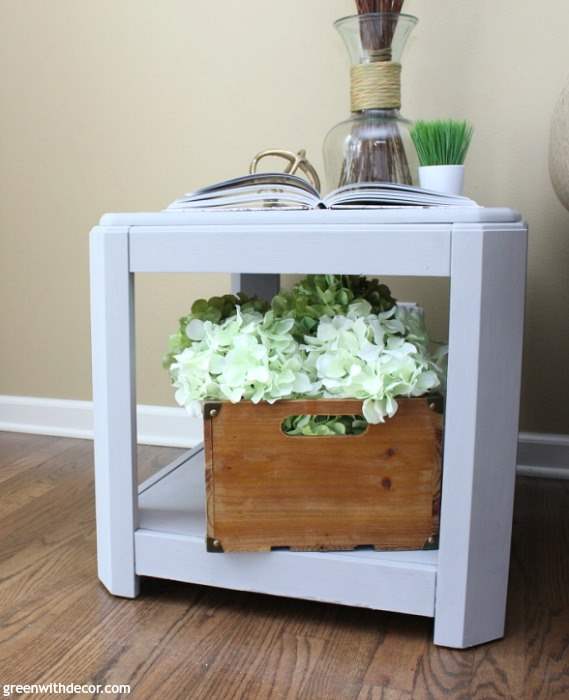
And can we talk about that wood crate?!?
I bought three of them at Marshall’s the other day, and I am obsessed with them. I’m going to use them as shelves once I figure out where to put them.
I wanted to try DecoArt’s chalky paint just to see what else was out there in terms of furniture paint, and I’m a fan!
It’s a bit thicker in consistency than paint I typically use for furniture makeovers, but the painting process is really pretty similar. Plus I’m happy with this gorgeous gray color.
This post contains affiliate links. This means if you click the link and buy something, I may receive a small percentage of sales at no extra cost to you.
Supply list for painting a table:
- Paint, here’s the color I used.
- Drop cloth
- Stir stick
- Paint brush
- Small paint brush
- Sanding sponge (optional)
- Wax
- Wax brush
- Lint-free cloth
How to paint a table the easy way:
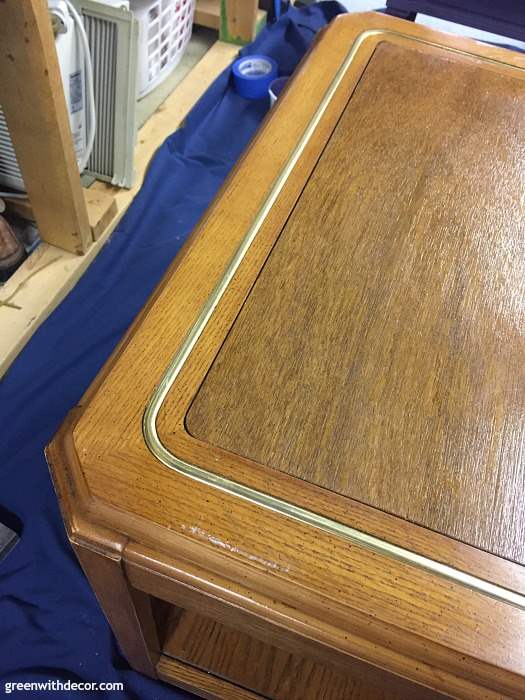
1. Wipe down your table.
My table was covered in a layer of dust and dirt, so it needed a good wipe down.
You don’t have to worry about sanding or priming with chalky paint.

(Ignore that purple table in the background. That was another new paint I was trying that I wasn’t so impressed with… I’m repainting it another color now.)
2. Paint.
With everything going on right now, painting this table felt really good.
I swear painting is like some kind of mindless therapy. It just feels good to pretty instantly see something transformed from blah to gorgeous.
With chalky paint, I always paint with brushstrokes going in the same direction. The paint applied really easily over both the wood and the gold trim on the table.

To get in some of the crevices, I used a smaller paint brush to make sure all of the wood was covered.
I went with two coats to get good coverage, although DecoArt says one coat usually covers most pieces.
3. Distress (optional).
I feel like I don’t distress pieces as often as others who use chalky paint, but sometimes I just like the look of a fully painted piece. It just depends on the decor style you’re going for.
Distressing is easy though. Just take a sanding sponge and rough up the piece, especially along the edges.
If you sand off too much paint, you can always paint a bit more on. Basically, you can’t really screw it up!
(I talk more about distressing furniture pieces here if you’re interested.)
4. Seal the table with wax.
Let the paint dry for 24-48 hours before applying wax.
Swirl your wax brush around in the wax container, then apply the wax to the table using circular motions.
Use a clean, lint-free cloth to wipe off any excess wax.
Wax needs to be reapplied every six to 12 months.
On pieces like an end table that see a lot of use and items being placed on top, I’d stick to that.
On pieces I don’t use as often, I have to say I wait a bit longer between resealing. It just never quite seems to make it to the top of my to-do list.
And again, can we talk about how fun these rustic crates are!?
The book open on top of the table is this one by domino, and if you love looking at pretty decor pictures, you’ll want a copy, too.
GET THE LOOK:
Since a popular question I get is “Where’d you get that?!,” here are links to the same or similar sources:
- Wall color: Camelback by Sherwin Williams
- Domino book
- Gold sphere
- Hydrangeas
- Crates (similar here or here)
Remember to check out the other ladies’ projects, too for more no-spend DIY projects. Spring seems like the perfect time for all of us to clear out all the ‘stuff’ we’re keeping for future projects!
2 Bees in a Pod | Wire spool plant stand
Flourish & Knot | Painted geometric DIY flower pot
Green with Decor | Chalky painted table (you’re here!)
My Creative Days | Painted galvanized planter
My Life From Home | DIY book page flower
Personally Andrea | Rustic three-tier wood slice stand
VinYet Etc. | DIY copper terrarium
SEE MORE OF MY FURNITURE MAKEOVERS HERE:
Remember to bookmark or pin this post if you want to save it for later!
Pin it!
Want to read more posts like this?
Follow along: Get my emails | Facebook | Pinterest | Twitter | Instagram
Vicki and Jennifer 2 Bees in a Pod says
Hey Meg – Your chalk painted table looks amazing! I bet the lady from your curb-side find is kicking herself now 🙂 The new finish is amazing and it looks beautiful in your home!
GreenWithDecor says
Thanks, Vicki!
Sarah says
What a great makeover, Meg! It is completely unrecognizable from it’s original, dated look. I love the colour you chose.
GreenWithDecor says
Thanks, Sarah! I like the gray, too.
Laurie @ Vin'yet Etc. says
Hi Meg, I agree painting is so like therapy and you have something so awesome to show for this “therapy” session. Love that way this curbside find turned out and YES completely obsessed with those rustic crates too!
GreenWithDecor says
It’s such great therapy! Thanks, Laurie!
Lindsay Eidahl says
Great makeover!!!!
GreenWithDecor says
Thanks, Lindsay!
Emily says
Your table makeover turned out great, and I agree – those crates are amazing!!
GreenWithDecor says
Thanks, Emily! I’m way too obsessed with these crates!
Melissa says
It looks amazing! Free is even more amazing and you made it look beautiful! What a fun idea for the zero dollar challenge!
GreenWithDecor says
Thanks, Melissa! Free really is amazing, right?!