It’s time for another Create & Share Challenge post! This challenge was a fun one: update an old lamp, upcycle something into a lamp or DIY a new one.
I was excited about this challenge because I hadn’t done a lamp project yet. I came up with a few ideas, so you may see some more lamp project ideas around here in the future.
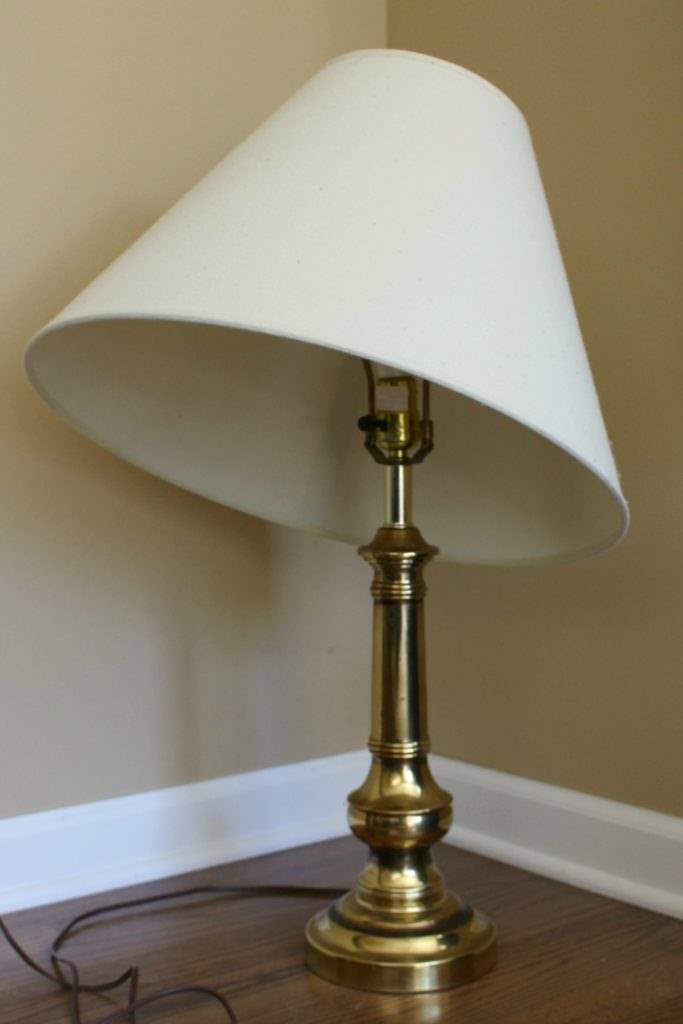
You know those gold lamps that it seemed like everyone’s parents/grandparents used to have? Those really old ones?
I used one of those for my project.
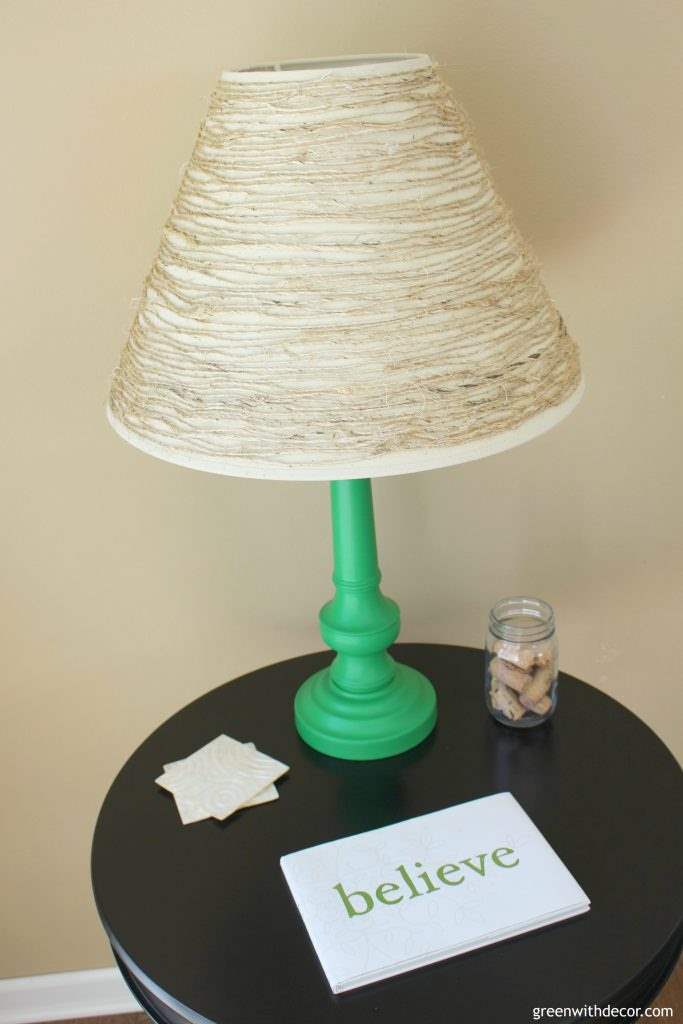
And here’s what it looks like now:
I wasn’t sure how painting one of these old lamps would go, but it was even easier than I thought. The paint stuck to the lamp without a problem.
Here’s how the lamp started.
Rough shape, right?!
This post contains affiliate links. This means if you click the link and buy something, I may receive a small percentage of sales at no extra cost to you.
Supply list for a lamp makeover:
You might think the supply list for this project is a little strange. ‘Mayonnaise’ isn’t a typo. I’ll explain.
- Old lamp and lampshade
- I used Velvet Finishes’ Enchanting green paint, plus the Velvet Finishes READY and PROTECT products – such easy paint to use!
- Twine (I mentioned in a recent post that I was shopping for twine, which lead to a quick update in the bathrooms.)
- Drop cloth
- Painter’s tape
- Paint stir stick
- Paint brush
- Hot glue gun
- Spray adhesive
- Mayonnaise. Yep, mayonnaise.
How to paint an old lamp:
1. Wipe off the lamp to get rid of any old dirt and dust.
2. Tape off the lamp.
I put tape around the cord at the base of the lamp, around the socket and under the finial.
3. Paint.
I just used Velvet Finishes’ Enchanting paint for this nightstand makeover and love how easy it is to use.
And isn’t it a fun shade of green?! I’m already thinking about my next project with this bright green.
If you’re using Velvet Finishes paint, follow these steps:
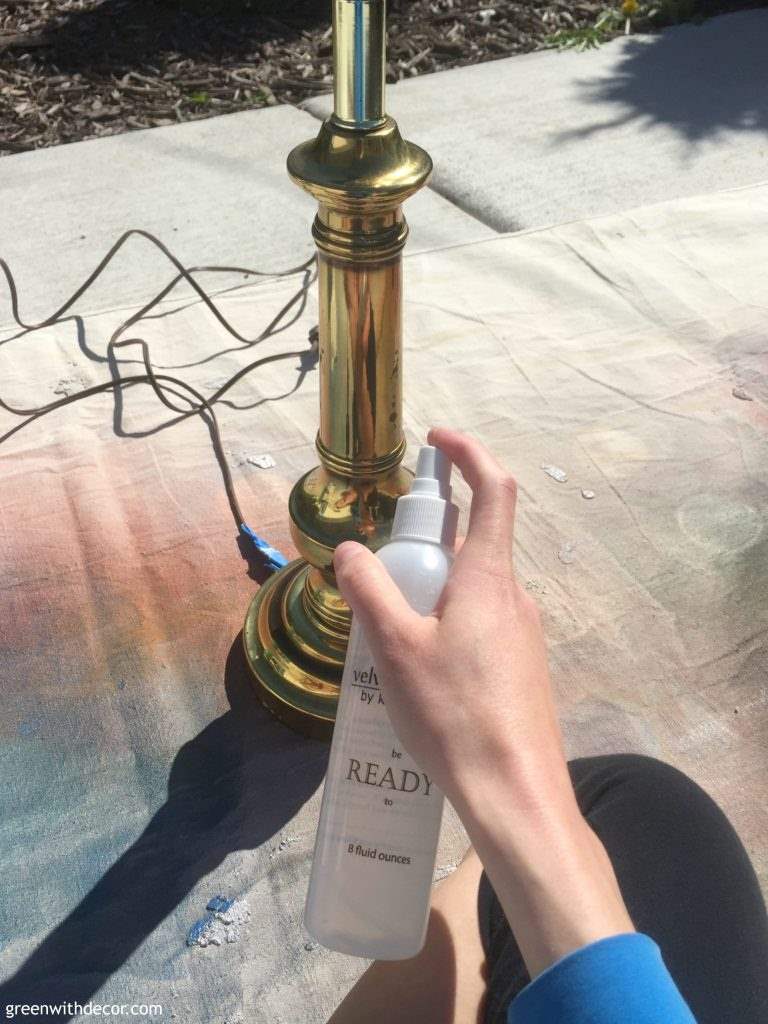
Spray the READY solution on the lamp, let it sit for a minute or two and wipe it off.
Shake and stir the paint. I did about three coats of the Enchanting. Velvet Finishes recommends not applying more than three coats in 24 hours.
With Velvet Finishes, it doesn’t matter which way you apply the paint.
Just cover the piece with brush strokes in whatever way you feel like. The brush strokes won’t show when the paint dries.

As you can see, it was warm enough to paint outside.
I can’t tell you how excited I am to say that!
Then mix the PROTECT with the paint. Apply the mixture with a paint brush. If you see streak marks, apply more. This protects the piece for its lifetime and never has to be reapplied.
Velvet Finishes is awesome and so easy to use!
How to add twine to a lamp shade:
My mom did this part of the project while I was painting the lamp. Hence her nice painted nails in the pictures instead of my usual, non-manicured hands.
1. Glue the start of the twine to the lampshade.
Use a hot glue gun to get it started.
2. Circle the twine around the lampshade.
Spray the adhesive over the shade and the twine as you twirl the shade and twine around and around.
Warning: your hands will get REALLY sticky while you do this. I have a solution though!
3. Glue the end of the twine near the top of the lampshade.
Use a hot glue gun again here to secure the twine.
4. Clean up.
Soap and water won’t get the spray adhesive off your hands. Use mayonnaise.
I know, it sounds so weird, but it works! Rub about a half cup of mayonnaise on your hands a couple times and the sticky mixture will come off.
Here’s the finished lamp:
I love the colorful, coastal feel of it. It’s fun doing some projects that don’t fit my usual decor style.
Wouldn’t this look good in a beach house?
If only we had one of those …
Take a look at the other bloggers’ projects for more fun lighting ideas!
Casa Watkins Living: DIY Mud Cloth Lamp
Pocketful of Posies: Vintage Desk Lamp Revamp
Lehman Lane: DIY Hanging Light
One Mile Home Style: DIY Golden Atlas Lamp
The Twin Cedars: No Cost Lamp Revamp
Lovey Etc: DIY Lantern Lamp
This Is Our Bliss: DIY Color Block Lamp
Green With Decor: Old Lamp Update with Twine (you’re here!)
DIY Beautify: Light Fixture Makeover with Mason Jars
Creatively Homespun: DIY Car Parts Lamp
My Life From Home: DIY Coffee Pot Lamp
Remember to bookmark or pin this post if you want to save it for later!
Pin it!
Want to read more posts like this?
Follow along: Get my emails | Facebook | Pinterest | Twitter | Instagram
Creatively Homespun says
Awesome!!!! I like that not only did you change the color of the base, but it looks great with the shade revamp! It turned out fantastic! xo!
GreenWithDecor says
Thank you!
Amy @ My Life From Home says
I love the finish of that paint! And the twine is awesome. Thanks for the great tip on the mayo!
GreenWithDecor says
Thanks, Amy! The mayo tip is so weird but so helpful! 🙂
Cat @ Pocketful of Posies says
Cute lamp meg! The twin was the perfect touch to accent that beautiful green color! Thank you for playing along! Pinning!
GreenWithDecor says
Thanks, Cat! You know I love the green 🙂
Celeste says
Love that twine on the lampshade, and of course the color you painted the lamp is just gorgeous. It looks completely different, and such an amazing transformation. What a fantastic makeover!
GreenWithDecor says
Thanks, Celeste! I love how different it looks than the ‘before’!
Meghan @ The Twin Cedars says
Who knew, mayo! Haha! Love that pop of green and the twin is perfect. Great update Meg!
GreenWithDecor says
Haha! Thanks, Meghan!
Rachael @ This is our Bliss says
This is beautiful! That texture the twine added is so good! I’m loving that shade of green, too. Pinning for future reference!! – Rachael
GreenWithDecor says
Thanks, Rachael!
Tara @ Lehman lane says
Great lamp Meg! Of course, I love the green and wouldn’t expect you to paint it any other color :). I didn’t know the tip about mayo and spray adhesive. I am filing that away for a future project :). Have a wonderful week and take care, Tara
GreenWithDecor says
Thanks, Tara! Haha, the mayo tip is super helpful!
Carrie says
Great transformation! I haven’t used Velvet Finishes before but after seeing your tutorial, I think I need to!
GreenWithDecor says
Thanks, Carrie! You should check it out, I love the VF colors!
Audra @ Renewed Projects says
I am huge fan of twine wrapped anything and this lampshade is right up my alley! I’ve done similar things with twine so I can appreciate the time and hot-glue-gun-burned-finger-tips that goes into a project like this.
GreenWithDecor says
Gotta love twine! Haha those hot glue finger tips are always a bummer!
Janice says
Thank you for the idea. I did the lamp and lampshade today on an old lamp I had. I love it!!!!! Thank you so much
GreenWithDecor says
How fun! Enjoy your ‘new’ lamp!